Wednesday, December 28, 2011

Planning for next year

I've been thinking about what I want to make next year. Spent too long on this Strad this year. I have a Guadagnini viola back in cherry that looks promising, but I need some figured cherry to make ribs and a neck...at least the ribs. I just drew up and made molds for a Guadagnini and del Gesu violin. I have a del Gesu mold I made for the ole Bull, but the corners are farther out on it, so I made a slimmer one. The Guad and new del Gesu are almost the same in outline, but vastly different in arching heights. Guadangnini always seemed to use very fine grained, even spruce for the belly. Del Gesu used wood that had more "character". I have a mold and clamps and blocks for a Grancino viola that is nothing like the Guad. It has archings more like del Gesu and although it is 15mm longer, it is narrower than the Guad as well. Either paring would give me a challenge to get both instruments to sound good and I'd probably learn quite a bit. Then I saw a photo of a Guadagnini cello. Cute little thing. First cello outline I've actually liked. Drew it up the next week after analyzing it. Found that all three Guads I drew up are started the same way...with a triangle drawn on the lower bout centerline. Maybe a cello would be a real change of pace. I need to go to the wood store this weekend and check for cherry wood. Without that my options change. Do you think they'll have a 4 foot long chunk of figured maple big enough for a quartet? That would really be a challenge.
I'm starting another blog. This one is a devotional. Going to try to do it everyday, and still have time for violin making and life. It really kicks off January 1, but I have the first one on now. If anyone knows how to put an mp3 player on individual posts on blogger please tell me!
I've tried a couple and haven't been able to make them work. Of course I'm over 30. Would be good if I gave the link www.kensdevotional.blogspot.com

Sunday, October 23, 2011

Hello REAL color


It's been a month since I've posted? Crazy man. Time sure flies. Well I've put 2 more coats on the violin and looks like that may do it. I love the color. And it is more transparent than the Montagnana I made that is Venetian red (well he was from Venice!). Thank you Joe! If you're thinking of getting some violin varnish check him out first http://www.violinvarnish.com/. Speaking of varnish...I did cook some up today that I'm only going to use as a ground. I say that after recommending Joe? Well...I've had the stuff sitting there.....been cleaning things out....figured I'd cook some up and throw all the varnish junk away. The first part worked good. Poured more than half of it into a jar. Planned on thinning the rest out to use like thinned varnish.


Didn't work. The nice varnish turned into a gooey glob of gunk in turpentine. Should have just made it all thick. The varnish is very clear, like Joes. It's very thick, likes Joes. Dries in maybe a month, NOT LIKE Joes. His dries in one day of sunshine. Plus you can get Joe's in colors! I need to order the strings. Think I said that a month ago. And I still need to turn a button on the lathe. Besides putting the varnish on I have cleaned out a lot of junk out of my boxes downstairs. I want to get the stuff down so I only have one box of tools, one drawer of plans, and one cabinet of molds and patterns. Getting there. Now I can throw away the varnish paraphernalia.

Sunday, September 18, 2011

Trouble in Paradise


Should it surprise me. No. This violin has taken forever to do. I noticed it the other day when I got around to smoothing up the first coat of varnish after it dried. A crack. Never saw it before. Didn't appear to be much, but it was there. So I had to pop the belly off and put a couple studs under the crack. While pulling the top off I smelled pine....uncured varnish. A small bit got in an area on the bottom block, must not have been perfectly flat. So I ran a plane blade over the area on the block and the belly. Didn't seem bad. The crack doesn't go all the way through to the inside, except for the overhang area, and that is going to be cut away for the saddle.


I decided to put two studs on it. One right at the block and the other right near the end of the crack that shows on the outside, right at the end of the bass bar. I imagine both areas are high movement areas (relative to a violin) and better to be extra cautious. I'll glue the belly back on tomorrow. This time maybe I'll remember to put the pins in too, to fill the holes. Oh yeah, I have to make 'em, that's why they never got put in the first time! Where do you buy 3/32" dowel rod?

Sunday, September 11, 2011

Hello color


Did it again! Hit enter after putting my title in. OK, here's what's going on today. Varnish. Glued it up yesterday and this morning took one last shot of it before putting a light coat of Joe's Rose Greek Pitch varnish on.


I start with the scroll first. There is no way to hold it if you do the scroll last, and I like to get it out of the way because it is the hardest to do. Next on the hard to do list is the ribs. I do those next. My method for the whole process is to put a little varnish on a few places with a brush and blend it all in with my fingers, or palms. I did the back next and the belly last. I don't think it matters much at that point which side you do first. The varnish has a lot of color in it so the hardest thing is to get the coating even so it isn't blotchy. I don't see too many blotches. When I smooth it up after it is dry with some oil and tripoli (or pumice, I always forget which one is finer) I can smooth out any blotches I see then.


A few thin coats is what I'm aiming for. Nice color Joe! I think 3 coats will look real nice. It's been out on the porch all day, mostly cloudy though (been that way or raining for more than a week), but the varnish mostly not tacky already.


My homemade varnish took forever to dry. Well, weeks anyway. Oh, by the way I forgot to publish the post before this one! Please check it out.

Sunday, August 28, 2011

Now I can finish it up


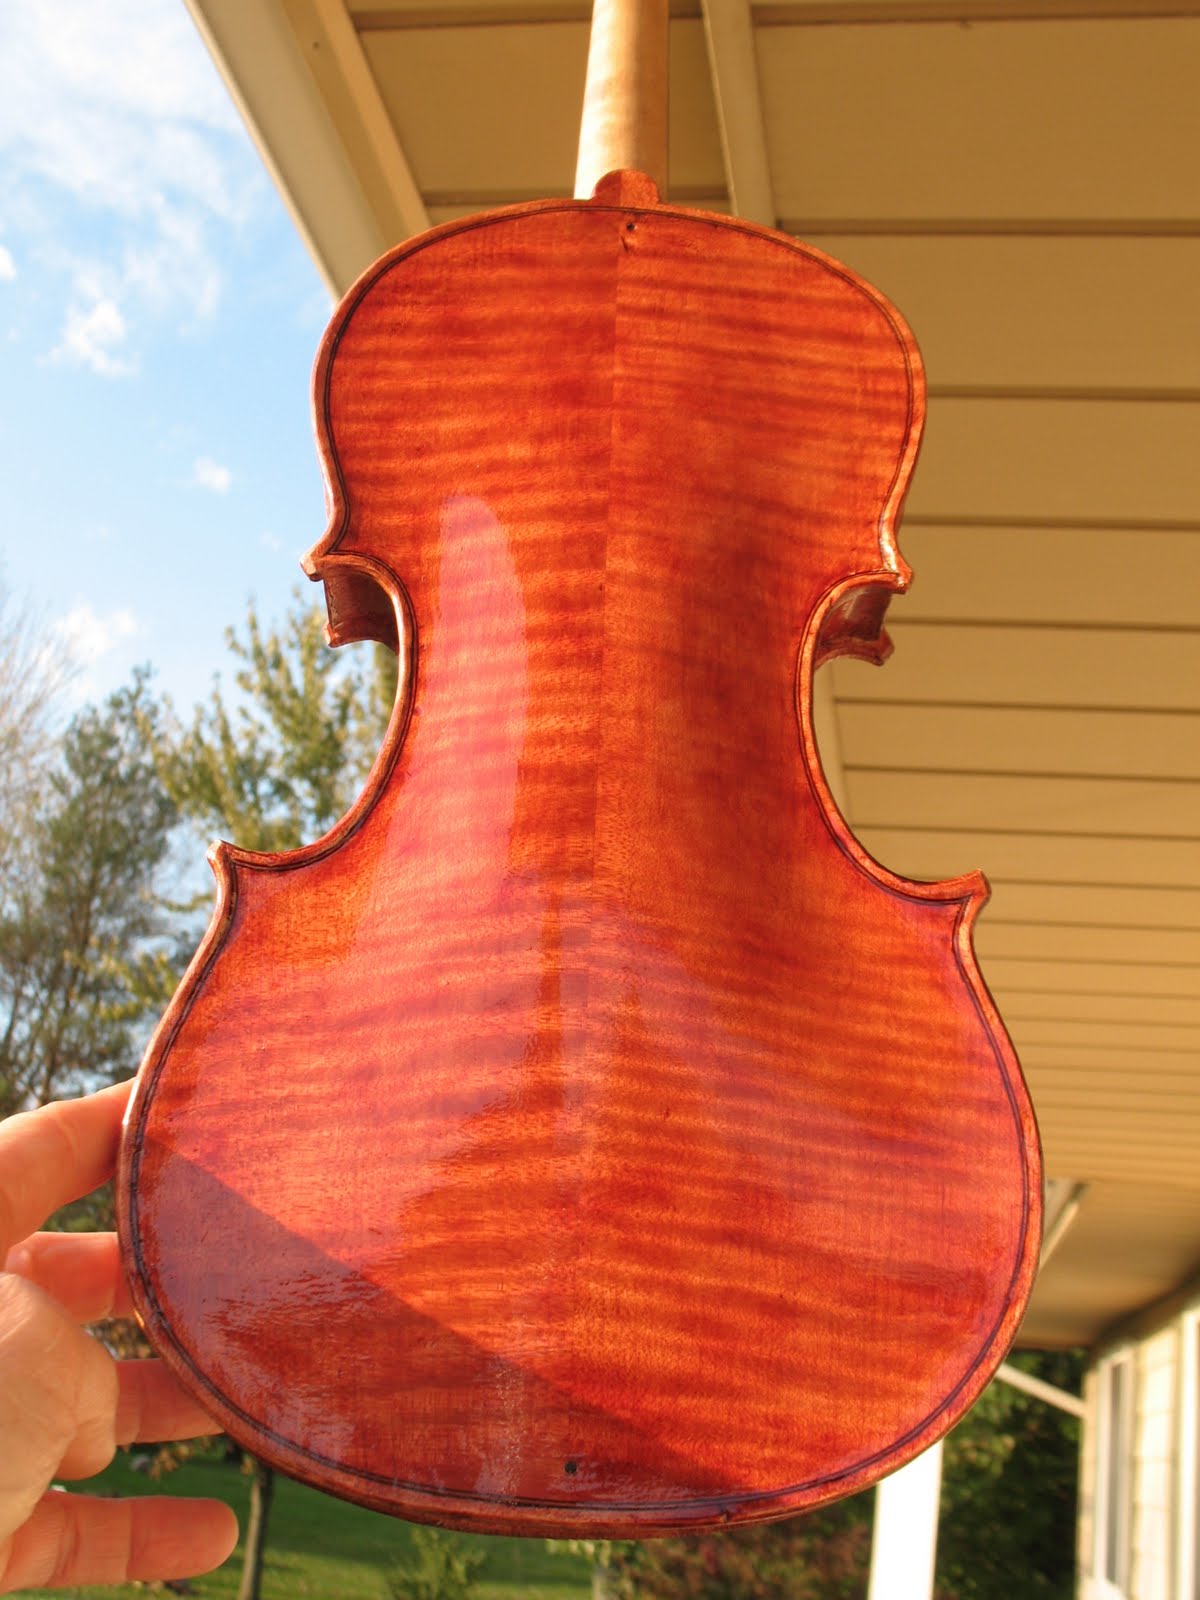
Alright! We finally found a second car! It seems like we've been looking for over a month, with no spare time for anything. I have read a few good books from the library, and just picked up 5 from the Salvation Army store (5/$1!). One I read was Extraordinary by John Bevere, good book. I got my varnish (Rose Greek Pitch, from violinvarnish.com), I haven't tried it out yet, only smelled it (smells good to me), so once I fix the chipped corner I can glue it back together and varnish it. That will be my project for today. I like doing stuff, but fixing stuff always seems to bother me. Don't know why. Even at work. Making new parts, either green stock or finish turn is nice. Having to rework a part for an LEC change is annoying. Why didn't they just get it right the first time? Who chipped the corner off? Oops, that was me.

I don't have anything new except my latest song. I wrote on christiansongwriters.org about this song that sometimes I finish a song and can't believe I wrote it. In reality I'm just the scribe. Hope you enjoy it.

Give Your Heart Away
(c) 2011 Ken Nagy

Wispy fog floats over the ground
Deer jump fences in graceful bounds
The edge of the sun comes in view
Another day begins anew
To all of these things you are blind
Your heartbreak numbs your grieving mind

I've never been there but Jesus has seen it all
Lean on Him for comfort He'll never let you fall
Drop your burdens at His feet He knows all your fears
He'll be there while you weep to wipe away the tears

So tap into Gods love
That flows like a river
Flooding your heart with grace
Dwell in the Spirit
And not on your pain
It will vanish without a trace

GIVE YOU HEART AWAY
TO GODS SON
LET HIS LOVE AND YOURS
BECOME ONE
DON'T LET ANYTHING
BREAK APART
THE BOND BETWEEN HIS
AND YOUR HEART

Betrayal pierced right through your heart
You are broken and torn apart
But with Christ you don't have to bear
The bitterness of deep despair
When you feel that it's hard to cope
Accept His grace and you'll find hope

So tap into Gods love
That flows like a river
Flooding your heart with grace
Dwell in the Spirit
And not on your pain
It will vanish without a trace

GIVE YOU HEART AWAY
TO GODS SON
LET HIS LOVE AND YOURS
BECOME ONE
DON'T LET ANYTHING
BREAK APART
THE BOND BETWEEN HIS
AND YOUR HEART
LET IT GROW IN YOU
EVERY DAY
AND IN TIME YOU WILL
be OK

And in time you will
be OK

and in time you will

What's cool is I hear the song sung to me as I type it in. It's a woman's voice. I can't sing that high (maybe I could, but it wouldn't be pretty), it goes to B5. I have a group on my mp3 player I thought was My December, thought that voice would be good for it. Found out its is an album by Kelly Clarkston! Boy am I out of it! Like her voice though, more rough and tough. I think it's in 6/8 time. But it's in 2, so it could be triplets. As a scribe I'm OK. Not much of a song writer.

Wednesday, August 10, 2011

Pegs done


Well I finally have something to show. We've been really busy. Last night I turned up some fake ivory for the pegs. It isn't plastic. It smells kinda like glue when you turn it. I thought of using a simple 2 curve profile for it, with undercut ends. I see in the light (did it in the basement) that my undercuts could be more undercut, but that is easy to accomplish. They also look a little wide, maybe would have been better with a small hump in the middle, and the wings spreading out from there. Oh well. Next time.
I'll just imagine they were made by a baroque guy who had minimalist ideas.

I've worked a lot of overtime lately, and we've been looking for a second car. Used cars are expensive. One night a little over a week ago we had thunderstorms all night long, from 9pm to 7am. Ended up getting about 5 inches! Then another inch the next night.
So much for the grass dying off so I don't have to cut it!

Saturday, July 16, 2011

More thinning on the belly


I took the belly off after gluing on the back. I needed to do that to replace a piece of broken rib at a corner. I was shocked to see that the belly weighed 84 grams. Way more than I expected. I expected it to weigh more, but was hoping for high 70's. I evened out some spots that I could feel with the thickness gauge. I'm sure 300 years ago they could feel the same spots with calipers. Then I thinned the central area from about 3mm to 2.5-2.7mm. I also enlarged the 2mm thick areas of the bouts. Got it down to 82g. I may play with it a little more. The long arch and bass bar seem to be working right, I can see it move up and down when I push on the bridge area. I don't see that on another belly I have loose with a bass bar and f holes cut. Maybe I'll see if I can get it to be even more responsive, without lowering the tap tone or weight too much and making it too flimsy.

Thursday, July 7, 2011

Gluing the back on


Well I did get stuff done! I have the pegs ready for the decorations and got the back ready to glue on. I filled in the chunks of the belly that broke out when I cut the f holes. Now I'm gluing on the back. These are some funky clamps I made up a couple years ago. They do work, but not as well as I imagined. I like the idea of the Herdim clamps that run $400 a set, but $400 a set!!!! I designed these to be set like a wedge thinking that it would be fast and easy, it isn't either. You squeeze them to get the pressure on the joint, then push the wedge in and it's done. Unless it moves, or slides away, or whatever it does so it doesn't stay tight. I can get them set right, but it isn't easy. I put glue on both the ribs/blocks and the back. let that dry and clamp it up. At this point it doesn't have to fit really tight. Then I take off two clamps at a time. Put a knife with hot glue in the joint and put the clamps back on. In other words, I do it pretty much normally. Imagine that.


I was thinking today about how the "hot" jobs we do at work would be priced at a premium at an outside tool room. The standard cost at least doubles when the part is needed immediately. The high cost should make the company change their practice and have spares on hand to save premium pricing. The same holds true in your life. Things we do that are against God we do at a cost, a high cost. If the cost wasn't high we might say, "Hey, lets do that again. It was wrong but we didn't get in much trouble." If God didn't put a cost on sin would we ever learn not to? Once we learn of the high price of sin, we should repent and do what ever we can not to do it. Learning to rely on God instead of ourselves is the same thing. He'll let us try for a while, then before the hole we are digging gets too big says "Stop. Let me do it."
If we've learned anything we will let him.

Just noticed my link for the song on the last post wasn't there...it is now.

Saturday, July 2, 2011

Will I get anything done?


Did it again! Put the title in and hit enter. OK, now I HAVE to write. The title is a question, but I'm sure already the answer is yes. I will get something done. Maybe not a lot, but at least something. I have three days off. Monday we have plans, so I have two days off. I did work some on the pegs. A little more to even them all up and then I'll have to make up the decorative turning that goes between the head and the shaft. As you can see by now you are way ahead if you just buy them! I'll should get over the dysfunction of wanting all the fittings out of the same wood. I do have a cherry viola that I just bought a hunk of figured maple to use as it's neck. There, it is different already. I still need to find something to make the ribs out of, and maybe I could buy all the fittings. Maybe that will help. When I turn the tiny rings I'll make up a button, that won't take long at all. I still need to plane the heel of the neck even with the ribs and glue the back on. It would be almost done then, but I need to pop the belly off to replace a piece of rib that broke off a corner. I was going to have a photo of the pegs, took several, but none were as nice as the pond looked.

I have a few books now. Actually bought them...at rummage sales and the Salvation Army. One I finished reading is Thunder in Paradise, Satan's Last Storm by Jonathan R. Cash. It is set at the end of the Millennium (The thousand year reign of Jesus on earth)when Satan get his chance in his final battle. Cool stuff. I'm reading one now called Joshua, a Parable for Today by Joseph F. Girzone that seems to be up there with The Shack as a must read book. It has been reprinted numerous times since it was first self-published in 1983. I just grabbed it at a church rummage sale before the lady who was getting books for resale took all of them. She missed the best. I'm sending the first out to our daughter in Arizona, like she has time to read it with 3 boys three and under! Maybe I'll have a library of books I can lend out. I wrote a rock song and sang it on a forum I'm on (Christian Songwriters Network). It would be good with a rock band and a real singer! With me you just get the idea. I think the lyrics are good though. If you'd like to hear it go to:
http://forums.christiansongwriters.org/viewtopic.php?f=17&t=16513

Monday, June 27, 2011

Looking more like pegs


Yikes, I hit enter before I wrote anything! Please kids, don't try this at home, these are trained professionals. Now, where was I. Ahh...my pegs. I turned the pegs down on the lathe the other day. I turn the shaft straight, so it is easy to turn the back end. Today I cut the heads a little with a chisel to make them all the same and not look clunky. Next I'll have to cut the "heart" out with a knife and tiny chisel. Then it's a matter of tweaking it until it looks good. I have one set I made that I like, but I wanted to make one without the little ball in the end. For some reason I keep breaking them off! I'm an animal. I'm not sure about the shape I have right now, it is just an eyeball thing, I didn't have a real design or print on these ones. Runny the good one was planned. Maybe I should have had a plan.


I had to work all weekend, but we salvaged the weekend by going to see a concert at Pine Knob (aka DTE music theater, yuk), We saw Francesca Battistelli, Jars of Clay, on of my favorites, and Stephen Curtis Chapman, my wife's favorite of group. It also started with Caleb, SCC's sons group (they also are his backup). Good stuff. Francesca sang all her hits. Jars of Clay played Two Hands, Flood, Dead Man, Love Song for a Savior, Five Candles, Lift up your Head, a new one, and maybe some I'm forgetting. Stephen Curtis Chapman played a bunch of his hits. The only problem was, (I can't believe it, I MUST be old) it was TOO loud. Loud is fine, as long as you have clarity. I didn't hear clarity. The bass drum (every band) pretty much made the bass impossible to hear. The guitars (all except SCC by himself) made the vocals almost impossible to hear. The vocal harmony and musical interplay was incredible in Jars of Clay, but would have been insanely amazing with clarity. But it was fun. I can hear music perfectly with my mp3 player, but I can't FEEL the music like that.

Monday, June 20, 2011

Neck glued in!


I finished smoothing up the neck last night and glued it in this morning. I really like the assembly board. Makes it a cinch to check the alignment and angle. As you see the eye of the scroll is in line with the line of the ribs. The nut is positioned right around the belly edge. The step is almost 7mm. That's a little high, but not too much. The projection at the 195mm stop is 27mm. I always forget what I set things to...need to make a booklet on each instrument where I can write down all the inspired, or dumb, things I did. You also see my unorthodox method of gluing. No clamps. I can't see the need! The neck is pushed into a dovetail, it can't go anywhere else. I brush glue liberally on the block. Then I slide the neck in place tightly, and double check the alignment and projection. Then you just let it sit. No fumbling, no mumbling.


Now it's on to the pegs. I have 5 blanks cut out. I'm a machinist. I know that one indiscretion can make a piece of scrap. At work it doesn't happen often, even with 62rc steel and .001" or less tolerances, but wood is a fickle thing so the chance of failure goes up. I also have another piece that could make 2 more, in case of disaster. As I've said before, one indiscretion in your life doesn't turn you into scrap. If you know you've done wrong, and confess it to the Lord, you have been made righteous. If it was only that easy on a lathe.

Sunday, June 19, 2011

3 weeks on a neck?


Well. I have the neck joint fitted perfectly. Was going to glue it in. Then I remembered to check the dimensions off my Borman check list (http://www.bormanviolins.com/setupdimensions.asp), and I realized I just roughed it in, the neck wasn't finished! It was 2mm or more thick everywhere. Rather than trying to say "It's for a player with bigger hands" I resolved to make it to print. It's just about smooth now. I don't like playing with the neck after gluing. Especially around the button. Working on the fingerboard while attached to the instrument is easy, but the neck I'd rather finish up. I'm pretty sure I'll glue it in today or tomorrow, but I've learned not to promise anything in advance.


Today is fathers day and we went to visit with my dad yesterday. Spent about an hour and a half there. Don't know how much he'll remember. 5 months ago at the memorial for his brother (see Reflections, Jan. 19,2011), he was doing pretty good for 90. He knew everyone there and was just like normal. Now his memory is fading fast. He doesn't seem to have an attention span of more than a few minutes, then he's off, thinking or doing something else. It seems like he knows that he knows us when we show up. He gets happy and asks how we're doing. But as the visit goes on it seems he knows he knows you, but can't put a finger on who you are, or why he knows you. Physically he's in pretty good shape. Shuns his walker most of the time, and seems to be as comfortable standing around as sitting. He seems to be much more alert than the others in his unit, probably keeps the attendants busy. At least he seems to be doing well, and we were glad to see him.
I don't know why God has things like Alzheimer's to ravage the elderly. But His ways are beyond our comprehension. We want to figure out everything (my wife says she doesn't want to know anything about physics, but that's a different story), but God says not to worry and to carry on. So don't worry. Be happy in the Lord. Enjoy this fathers day while it is here. The memory may fade in the future.

Friday, June 10, 2011

Neck fitting


Well I started fitting the neck last night. This is the first time I've used my assembly board. I like it. I mark the top and bottom widths of the neck, actually mark them 1+mm small. Then I saw the edges and add a few more saw cuts in between them. The I used a chisel to rough out the dovetail. Nothing unusual there. Cutting through the spruce on the top always amazes me. How is spruce so hard? That 4mm chunk of spruce is not easy to cut. Now how does the board change things? When I start to fit the neck I can immediately see if the neck is straight to the center line of the body. Then with four measurements, the projection, the step, the top of the nut, and where the eye is to the top of the board, I can check the neck angle and be sure everything will be good.


Right now the neck is straight and the angle is correct. I just need to keep it that way while dropping it about 7mm. Maybe when I get more experience I'll only cut the slot 1-mm narrow. This is one of those tasks where I need my magnifying headband and some chalk. The small details I can't see well enough, even with bifocals. I always had perfect vision, even though no one else in the family did. Age wiped away my short vision. I fit the neck just like the bass bar, with chalk. When you're done you should be able to hold the violin, with the board, up by the scroll. If you con't feel comfortable doing that maybe your joint isn't good enough. If you don't feel comfortable in your faith, maybe it isn't good enough.

Wednesday, June 8, 2011

fingerboard glued on, heading down the back stretch


Finally got the fingerboard on today. Yesterday I "tuned"the fingerboard. I figure as long as I'm thinning the bottom of the fingerboard I may as well see if it needs tuning at the same time. I'm not really sure what I'm doing at this point! It seems like there are bands that are higher in pitch when damped, but there are also bands that seem to be harmonically higher on when you let them ring. Anyway...sometimes they don't need much, sometimes a little bit (like this one), and I had one that needed a whole bunch. I don't know if it makes a difference. Maybe by the weekend I'll have the neck on and can start playing with the peg blanks I have cut out.

I seem to have a problem with free time, or lack thereof. I started thinking about it the other day and it isn't really a problem, but a priority. I ask God to use me. To let me be his hands and feet. To see things through His eyes, and get a I chuckle when I hear His small voice say "see, I told you". But then I say I don't have time. My life is great. It is never quite what I think it will be day to day. My plans may not go according to MY plan. Thing is, it isn't MY plan. It's HIS plan. I've been doing some things to get some of my songs out. I joined a website to help with some lyrics and music. I even had some feedback on one today. If you feel like a chuckle, take a listen to one of my songs at : http://forums.christiansongwriters.org/viewtopic.php?f=4&t=16500
It always makes me smile.

Thursday, June 2, 2011

Getting ready to set the neck


Well I was going to set the neck. Then I realized the fingerboard wasn't smoothed up on the top, but that's not a big deal. The main problem was it wasn't cut away underneath. Kinda hard to do that when the neck is on, without pulling the fingerboard off, and I don't want to do that. That part is a lot easier when you by a fingerboard blank, it's already almost done! Like most of my work I pretty much do the cut out with a scraper. I try using planes and gouges, but I have the best luck with a good sharp scraper. Just hold it in my hand, don't need a vise, and in no time at all you have a prodigious pile of ebony shavings. Ebony (at least this hunk, and the last hunk, and the hunk before that)just seems too splintery to use a gouge or plane.


I use the thickness marker to get my thickness even, just like doing the back, or the belly or ribs. I set it for 6mm, and smooth it up after making all the punch holes disappear. I still need to cut the top and the bottom square. I leave them long when I'm making them because I've found the ends never come out right.
This way I can keep a nice crisp edge that I always seem to lose. Same with the masking tape on the sides. It makes it easier to see the widths, (still not even, but I'll sprinkle magic dust on it before it is done) and keeps the edge sharp. I might glue it on the neck tonight so I'll be ready to set the neck some time this weekend. Goody, goody, I get to work Saturday again.

Thursday, May 19, 2011

Stalling


I have no camera available right now, and the next few things I'm doing (setting the neck, making the pegs, stringing it up in the white) all need photos. Speaking about stringing it up, anyone have a recommendation for strings? I've only used medium Dominates and an assortment of pure gut strings. The gut ones seem to have more overtones, they sound richer and more interesting. The biggest difference in tension between the gut and synthetic seems to be the E string. Maybe guts, with a light tension steel E?
I figured I could use the time to do work outside, but is is always raining. Or write the music down for 8 songs I wrote. There isn't an excuse for not doing the songs. Except that it is hard when you don't know what you're doing! I looked at some Christian song sheet music yesterday and I noticed I've been lazy in my rhythm. Most songs are not on the beat. When I sing the songs I don't notice that they aren't on the beat, so I write them down on the beat. When I play the song back (with the computer software on a "piano") it sounds dull, and lifeless...because it is on the beat. A couple times I got the notes off somehow (easy when you don't know what you're doing) and they switched to eighth and sixteenth notes with ties. I thought it looked weird. That's the way it's supposed to be! As far as grumbling about the weather. That, and slow drivers are my weakness.
I should be like David when he wrote a psalm. Many start off with gripes or complaints, but they always end with thanks and praise. Thanks for the rain. You know we need it. Praise to the One who makes the clouds to bring the rain, to bring the spring growth, to bring the summer ripening and the fall harvest. Praise even for the winter snow. Praise even for the long cold spring (after the long cold winter), we've only cut the grass twice this year so far! The photo is some Evening Primrose blooming by the pond last year. I hope that's what they are! I thought the creeping stuff behind it was Primrose though. Ah, they are Sundrops. Related to the others but the flowers close at night.

Sunday, May 15, 2011

Motivation, got any?


I'm not one to be depressed. Don't quite understand it. But sometimes I just don't have any motivation. All week the weather has been fairly nice. Friday and Saturday were beautiful, high around 80 and sunny. I had to work Saturday. Stuff to do outside competing with making violin pegs, and songs to write music for. So now that Sunday is here and the weather is nasty (I don't believe global warming, haven't had a hot summer here in Michigan since 1988), cold (40's), rain (all day long today, and thunderstorms every night all week long to wake you up), you would think the pegs or songs would win out and the lathe would be spinning or the notes written down. Not yet. After a couple of nice days this weather really feels cold. Had to take the car up to get gas and a newspaper. The cold rain dripping on me and the 20mph wind made me shiver, and a couple fingers turned white. Didn't get that all winter! Came home and the cheap (free) program I have to help on music scores wouldn't cooperate. Couldn't remember how to get it to work, and it really is work if you don't know what you're doing. I might get on with the pegs, but it is so gloomy and dark I can't get going. How do people living in the north get through the winter? Once I get going on something today (it's almost 2) I won't want to stop. I just can't pull the trigger. The photo is from February. It's probably only 20 degrees warmer today. It ain't right.

Sunday, May 8, 2011

Squeeze in the time


Another week without much done. The belly is tuned now after sealing. It didn't seem to change as much as the back did. Maybe the belly was tuned better in the first place! The next step will be to set and glue the neck in. I noticed the other day I hadn't finished the neck...no fluting or chamfers. So I did a little on it the way I usually do, squeezed in between other stuff. Fluting doesn't take to long. I just hold the neck n my left hand, and carve it in. I hold the gouges way near the ends, not on the handles. Now is not the time for leverage, just small cuts with a sharp tool.

I squeeze in time for other stuff too. Reading done in Kroger or Meijers. Music while washing the car and cutting the grass. My latest readers: From the Cross to Pentecost, by J. D. Jakes. Just started a new one by him Friday! 9 Days in Heaven, by Marietta Davis in the 1800's but updated by Dennis and Nolene Prince just recently. Very moving story. Heaven is for Real, by Lynn Vincent. A story along the same line, but with a little boy who knows much more than he should. I haven't finished Radical by David Platt (only seen it in one store), but it is good so far. At home, besides my normal stuff I read everyday, I've been re-reading Revelation illustrated and made plain, written by Tim LaHaye back when I graduated high school. I have the 18th printing from 1981 (garage sale).

I have my mp3 player on random play so the songs are all mixed up. Here is the playlist from washing the car: Sibelius sym #6 (first movement), My December How I Feel, John Mayer Crossroads, MercyME Love of God, Bartok violin concerto(first movement), Beethoven Sym #5 (third movement?), Casting Crowns To Know You, Jars of Clay Show you Love, Sting Fortress around your Heart. Then I'm related to Adam, by me came up and I had to laugh. A lot of songs to wash the car? Well I waxed it, and rainx'ed the windows too! Found a great tool that will work in the violin shop as well. Microfiber rags. Great stuff.

Wednesday, May 4, 2011

The belly is sealed


Here is the belly after being sealed. I used the same routine as I did on the back. It is lighter in color after being in the sun all day, but I like it better now. It was almost too golden before.


Now it matches the color of the back more. They are both very shiny. My other grounds were flat. The varnish coat was the only thing shiny. I hope this way works better. The effect of the ground on the belly is very dichromic. It appears much darker when looking at it from the end than straight on.


I put the back on my tuning fixture and did have to do more tuning on it to get it to where it was before. Mostly near the ends (more end grain to suck up the sealant) and in a few other spots that must have been thirstier. I'm glad I did it this way. At least I'll know if the tuning works.

Sunday, May 1, 2011

Back is sealed


I sealed the back today. I was going to seal the belly as well, but I found a place where the purfling was carved away and had to fix it. The first step is to burnish the entire back, edges and everything. Then I brush on a liberal coat of gum dissolved in water (60:1 water), let it soak in for a minute or so, blot off the excess with a paper towel. After it feels almost dry I burnish it again. Same sequence again, this time with liquid resin. After this it was nearly sealed. The last methods I used needed more coats than this. Most of the spots that were not sealed as well were near the ends where there is a lot of end grain. So I soaked the ends with some gum again, rubbing some around the rest of the back. After blotting it off I followed with the resin, and when it was almost dry I burnished it up.

At this point it seemed to be at a good point for the final seal coat. I want the top coat to go on when the wood is ALMOST sealed. I want to FEEL a little wood through it. I hope that after the final coat, THEN it will feel sealed. After that the varnish goes on, and if it chips or wears off, the sealing (ground) is still there.

The final coat is a very light coat of very dark varnish I cooked up a while ago. It's like a Fulton varnish with added resin, and no turpentine. It is very thick. I put a bit on a small, stiff artist brush, and use it like a stippling brush. Then I use my fingers to spread it around. It isn't brushable, only the fingers and hand can spread it around. It doesn't take long, and only uses a minuscule amount of varnish. How's it look?

Monday, April 25, 2011

The bad and the ugly


Ok, I'm going where most don't go...show you the flaws. Well, not all of them, only the ones I'm going to fix up a bit. The rest are "character". First up is the purfling that got carved through. I vowed not to do that again, but here it is. I need to make sure my platform around the edge is level, then make sure the channel is cut to the same depth. A dremel tool would probably help here, but I'm against it, at least while I don't have one.


Next is the split wood on the inside of the f holes. Never had that problem before, Englemann cuts pretty easy. This red spruce is a lot stronger and stringier. I did buy a Japanese blue steel knife as suggested by Michael Darnton on maestronet. I just used it to trim the holes up to size, the damage was already done. It cuts real nice, but that is no surprise, my 1" blue steel gouge is a workhorse. One thing I've noticed is knives (all cutting tools for that matter) seem to work better when slid in more than one direction at a time. Don't know how else to explain that, but if you try, you will feel the difference. Maybe the knife will make a difference on the next one.


Finally the rib break. Don't know how it happened. I'm guessing when I planed the top of the ribs after the linings were glued on. Maybe it had a slight crack, and the glue job must have been mediocre. I never like doing planing the ribs. It is so easy to cut more off the ribs than at the blocks. I did have a lot of trouble bending this maple. Nothing else I've used had this much flame. The birch has a nasty deep flame in it, but they are further apart and didn't seem to be as much of a problem. They weren't quartered either, maybe that helped. I'll try to get a piece to match the flame there. It shouldn't be that hard to fix.


Errors are inevitable, but they cut into your time. Fixing things always takes longer than doing it right the first time. At least these things are fixable. It is the same way with the rest of your life. Doing the right thing may seem harder at the time, but will always turn out better than going down the other path. But as soon as you realize you're on the wrong one, stop and get off! The longer you are on the wrong road the more backtracking you will have to do to get back on the right one. Even major errors in life are fixable, but only through Jesus. He's not a magic eraser, but He is the only way your errors can be forgiven. That is the truth, and the word in my title that is missing...the good.

Sunday, April 24, 2011

Balance


Balance is something that isn't a big subject on violin forums. Varnish, grounds, purling, f-holes, all get attention. Balance is a side subject. I think I've seen more comments about balance when it comes to violas. They are a trickier beast. By putting your left arm out further the viola suddenly gets heavier. We pull parts and tools off the machines sometimes at work that are hotter than we expected....they get heavy fast too! Some luthiers have suggested carving the back and belly until it balances on a certain point. I think that some move the neck step to 10mm, or more on violas mostly to get a different (better?) balance point while it is being played. I balance and tune fingerboards and tailpieces, unless I forget that I didn't and plunge forward on the next step. What's the point of balancing and tuning them? I don't know. It just came to my head one day, it was doable, so I did it. Many times I get ideas in my head and I do them if I can. Songs and poems come that way. If you don't do it then, it may not get done. Balancing and tuning seem to go together on fingerboards and tailpieces. By some odd twist of fate (sure) the fingerboard is half attached to the neck, and half cantilevered over the belly. I found that they can be balanced and tuned. Do they sound better? I don't know. Tailpieces are the same way. I found that out when I made my first one. It was a baroque wedge shaped one. I found while drawing it up, the area was the same at the ends, and stayed about the same area equidistant from the center. Most modern tailpieces are heavier on the bottom half. The one I just made I balanced, but forgot to tune. It is a bit heavier than I would have liked, but I'll see how it does. The photo shows 2 store bought, and 2 homemade tailpieces. I like the inlaid one for my tiny 1666 Strad, but it is more work. I'm thinking that I need to make the fittings beforehand. When things get almost done I get too antsy to be playing around making stuff. Balance is always supposed to be a good thing. But on some things in life you don't want balance. You just need to have a one track mindset. Place your life in the hands of Jesus and let him lead your life. That is one thing you don't need to balance out.

Wednesday, April 20, 2011

Let it go


I wanted to use yellowheart as an accent wood on the fittings. I tried, and tried, and tried. It won't work. It is too splintery. Drop back and punt. The buttery smooth rosewood is the backup plan. Get over it. The photo shows the offending piece out of rosewood that I just couldn't make out of yellowheart. It also shows what my ground will look like.


I shot one photo from the top down, the other from the bottom up, to tried to show the flame. I have my ground all figured out. A coat or two of wattery gum. A coat of liquid resin to seal. Then a coat of varnish to put some color on it. The varnish is quite dark, but I don't remember what it was. There is kind of a label on it, but I don't understand my abbreviations! I will use Joe's varnish on the real one, just haven't ordered it yet. I have some oopsies to fix before I can seal the plates up. A couple spots I carved right through the purfling...oops. One piece of the ribs in the corner broke off...oops. The underside of the f holes is splintered in spots...oops. Oops seems to be the word of the day. I'm not perfect. Nobody is. Only one man ever was. He gave his life for ours. Won't you give yours for him?

Monday, April 11, 2011

Same thing again!


I know you've been there. Seems like day after day you do the same thing, but nothing ever gets accomplished. I haven't worked more than 20 minutes or so any day on violin stuff. It seems like I've worked on it more, but I haven't. Anyway, I've done some things. I have the tailpiece ready for the little ridge thing. Don't know what it is called. I don't think it is really called a little ridge thing. I started cutting out 4 different ones and two broke. One is still ok, and this yellowheart piece still needs some saw work. The other is a nice creamy textured rosewood. But I had in my mind trying something different, yellowheart on ebony. If I snap this one off I guess it will be rosewood instead. Tomorrow I'll put the little ridge thing in.
The other thing I've played around with is the ground sample. My other grounds were thinned varnish, or water based, casien mixed with other stuff I don't even remember! Seemed too thick and blocked the clarity of the grain. These are better. I put a thin coat of oil varnish over them and they look good. You can see the four different grounds, separated by a space of bare wood. The varnish on the bare wood looks almost yellow, the grounded areas are more like different shades of cardboard. The wood sample isn't uniform enough to get a direct comparison, but they all seemed to keep the varnish from soaking into the wood. I shared my ground recipes with varnish guru Joe Robson (violinvarnish.com) and he remarked "What was I thinking?" That means he was impressed, right? Well a statement like that is perfect for someone with the motto "why be normal". I almost have the belly tuned up. Once it is done, I may put a ground coat on it then check the tuning again. I don't know if it will change, but some makers have said that it will. We'll see.

Saturday, April 2, 2011

going slow


Well, I've started the tailpiece finally today. I have the top radius finished. Did it mainly with a flat plane blade used as a scraper. The profile is cut, but isn't perfect yet, done with a coping saw and half round file. The underside is roughed out with my 1" blue steel gouge. The holes are drilled in the end for the tailgut, done with a hand drill and .088" bit. No not an electric hand drill, the kind you turn with your right hand like a hand egg beater, remember those? Not unless you're as old as me, or work in a museum. I guess I better not say too much more about that until I carve away the underside where the nuts will go and make sure the holes were straight! I played around with some ground applications since it is getting near the end and I may want to try sealing the wood before I finish the tuning up. To early to tell how that turned out. Anyway, secret grounds and varnish are the key to a great instrument.

I wrote a poem a couple days ago and it was talking about believing in God just by belief, not reason, and doing what He says by faith in the outcome, not what you think. In other words take the Bible at it's word. I had a dream about the same thing last night. The point in the dream was not to just believe the things you like in the bible and gloss over the hard parts. Things would never get done if people always skipped the hard parts on their jobs. Cars wouldn't get built, space travel wouldn't happen, doctors would never become doctors, Gods work wouldn't get done. The message was reiterated in one of the books I read this morning (not the WHOLE books!) Loving God, by Charles Colson. He related a story where a friend had glossed over parts in the bible that said it was his job to help people, defend the defenseless, right injustice, etc. It's easy to say that you are good and nice, much harder to get involved. Don't know where I'm going to be called, but with all these things coming together I'll have to keep my eyes open. Sometimes things you could do are subtle. Sometimes they hit you like a brick.

Sunday, March 20, 2011

Designing a tailpiece

I have the fingerboard pretty much shaped and decided to get working on the tailpiece.
I've made a few and used store bought ones. On the shorter models I've made, store bought are always too long. Since this is a "standard" length Strad at 357 or so the store bought would work. But I have the ebony fingerboard that actually looks like wood so I figured I'd make a matching tailpiece. The first question is how to make it. You could to it empirically, and copy a bought tailpiece. But how do know it is right? I set about to design one from the ground up.

I have two tailpieces sitting around. One a cheap, black (looks like plastic, but isn't) round one, and another rosewood one with the two flat angles on it. They just picture them in the catalog, and don't name them by style, so they are just round and angled. They are both within a mm in length, around 114mm. The length is just right for this violin. The hole spacing, slots, half-round lip that sticks up (I have no idea what they call that), and the outside shape is virtually identical. It looks like the angled one may have slightly lower E and G holes. What would be the implication of that? I had to do some trig. I've figured out string angles before, but didn't get the actual angle. Coming up with those measurements brought some surprises. The D string has the steepest angle, followed by the A. The E string has the flattest angle followed by the G. Lowering the G and E strings at the tailpiece would bring them closer in relationship to the A and D in between them. Doing this the G and E strings aren't technically heading directly to the top of the saddle, but they have to go there anyway because that is where the tailpiece attaches. The A and D are directly in line to the saddle.
On a violin where the simple string angle I measured before is on the steep side... 157 degrees or a little more, having the E and G at flatter angles may be a good idea. The difference I figured between the inside and outside string was about 2.5 degrees. That's more than the difference between models. The 42mm radius on the black tailpiece doesn't seem like it would work at all. That one would flatten the outer two strings over 2 degrees more. Maybe I'm on the wrong track. Maybe I'm just plain wrong. Oh well. I'll make up my "experimental" tailpiece. If it doesn't work, there's always store bought.

Thursday, March 17, 2011

Odds and ends


The photo is of our backyard last fall.
I've been doing some things, but they don't look like much. I have the back area tuned. Ended up with 3rds, 5th, minor7th and an octave, just like it's supposed to. Of course sometimes it takes a few listens to figure out what you got. It sounds like D when you tap it, but it rings at E. Go figure. I thought they would be the same. Ha! I just checked and 285, or around D is one of the prominent modes on the free plate, maybe mode 4? I took it off the fixture to check it's stiffness. It's 4g lighter and it lost about 4hrz, so the stiffness is still around where everyone says it should be. Everyone? Isn't that what your kids say..."But EVERYONE does that." Feels really stiff to me. I thought these things were supposed to move. I'm tuning the belly now. It seems to have C# as the fundamental, that's a semi tone lower. Just about what EVERYBODY says it should be. I'm sure when I glued it on the ribs it rang at over 360, 272 is a lot lower than that. Maybe that is mode 4 as well. After I glue the back on I'll pop the belly off and give it a check. I'm still learning so I need to see what I actually did, to see where I'm going.

So the numbers are coming out close to where they should be according to everybody. It is wood shaped like a violin body so that isn't too surprising. What is surprising is how a great violin can be just slightly different than a so so, or bad violin. There is no way to control all of the parameters. The belly, the back, the ribs, the neck, the bridge, the soundpost, the fingerboard, the strings. Any difference, any variance, and the result is different. There are more things going on than you can keep track of. The world is the same way. The snow just melted and you can finally see the ground. What is amazing is that under the snow plants were growing. Daffodils (deer eat tulips), mums, and other hardy perennials are already pushing out of the ground. Things going on that you don't see. In your life things go on underneath, that aren't seen by others or even yourself. The things going on underneath have great effect on what comes out on the outside. Fill the inside with God's love and the outside will be beautiful.

Thursday, March 10, 2011

Wrong way to make a fixture


Well the fingerboard holder didn't work. It may have worked if I made it out of maple, and not spruce! The soft wood just squishes and is useless. So I just did it the old way. Rough it out with a 9" plane, then get the 42mm radius set with a wooden plane I made up. I finish it up with my favorite scraper, a plane blade, and the blade out of the wooden plane. I could probably keep the blade in the wooden plane, but it came loose, so I left it out. I'm a scraper guy. Some are file guys, plane guys, sandpaper guys. I'm a scraper guy. The blank is still big. I ran into an aberration in this blank. Not as bad as the last blank I scrapped, but annoying. Most of it may disappear, but some will have to be hidden.
I have been playing around trigging out different violin sting angles and neck sets. See, math is fun! It started after my Ole Bull fingerboard moved down, and the belly moved up. Turns out the dryer vent was loose, and the instrument was absorbing the excess moisture. People on maestronet.com were suggesting some things and some said new instruments move. The only one I've seen move is the Montagnana with the outrageous arch. It bulged up some in the upper and lower bouts. Some said they set the fingerboard projection higher, say 27mm, in anticipation that it will drop after being strung up for a while. So I did some calculations and came up with this:


On a baroque Amati, they would have a straight neck, put whatever bridge height they felt proper, and fabricate a fingerboard to fit underneath. Later, they started morising the neck and tipping it back. I wonder if they did it to make fingerboard replacements easier, and then found players liked the thinner angled neck. Anyway, the change didn't really change the string angle much. The models arch height, length and stop makes more of a difference, and then it still is not that much. The included angles run between 157 to 159 degrees. The modern instruments have constraints built into the formula so each projection (marked elev) will only give a small range of string angle/neck angle that will give the proper (6-6.5mm) neck step. The shorter instrument would be a Bergonzi or Guadagnini and the Maggini is actually a model SMALLER than the original. One thing of note; the baroque instrument would have about the same string angle, but with the shorter neck they would also have a shorter string length(except the Maggini). The tension on the strings would be lighter, even though the string angles are the same as modern instruments. I believe this is all correct, but I could be wrong. Let me know. Don't know how I got this blue and underlined!

Sunday, February 27, 2011

Slow week


I didn't accomplish much this week. I sawed the sides of the fingerboard (10 minutes max, counting the planing), and started making a fixture to hold the board while planing the radius on. I used to try to hold it on the ends, but it is just too hard to do that way. A fixture is needed. It's a very simple thing.I have all the pieces cut out. I still need to cut 5mm deep grooves, 5mm wide (the width I made the thin strips), and glue them into the base. After planing the strips so they are 5mm proud of the base I'll saw it in half lengthwise and voilĂ , a fingerboard holding fixture. I'm making one for viola as well. It WILL be done this week, and I'll show the results. I spent more time drawing up plans for a Guadagnini viola and violin. I have the Strad poster for the viola, but even with that a working drawing is needed. The violin is from photos in the book Masterpieces of Italian Violin Making, by David Rattray. Cool stuff in there. I worked them out to scale on a standard sheet of paper, but drawing them full size exposes all the flaws! I think they are set now. The violin has fairly tall arching, almost as high as the viola. It is also on the small size, as violins go, much like most del Gesu instruments. I thought it might make a nice companion to a small del Gesu model. I picture myself making violins, violas and cellos that are just a bit different, but great instruments. Maybe a couple larger violins, A Maggini and a long pattern Strad. An Amati and something else in the middle, and the del Gesu and Guad on the short side. But Guadagnini is supposed to have made excellent cellos, so maybe just make Guads? Gagilanos look cool too. Any thoughts anyone? I put the two patterns on my lightbox and the Guadagnini is almost identical in form to the Ole Bull del Gesu. I needed to re-do my viola plan after finding some things out while doing the violin form. I'm happy with the way it came out. Now I can make up a mold for the viola. I have a back roughed in for it, you can see from the photo it is VERY rough. I had to cut a gum pocket off the upper bout and glue a wing on. I still need a neck block and some rib stock. I usually have buy a board big enough to saw out ribs and necks, but this one and another were just big enough for backs. Anyone have some figured cherry for ribs and a neck? I thought about 1/16" veneers, but haven't been able to find any figured cherry. Also a lot of the stuff is 4' x 8'! Maybe I'll need a trip to the Woodcraft store.

Sunday, February 20, 2011

Starting on the fingerboard


I'm still doing some tuning on the back and belly. Tuning seems to be the king of thing you do for an hour or so, then do something else. Something else turned into a few other things: saw out the fingerboard blank and plane it some, figure out the outline of a Guadagnini violin, and then take another go at the Guadagnini viola outline after gaining some insight after cracking the violin code (I think). They are different, the violin is WAY slimmer, I call the viola "Fat Boy", but that's not politically correct. Good thing I'm not into politics. I think Guadangnini went about designing both instruments the same way, but looking for different things.
The thing I'll talk about here is the fingerboard. Most people just buy a blank. Again I'm not most people. I like to go to the wood store and tap on a bunch of wood blanks and hear how they sound. I did that the other week and picked up a chunk of ebony and another of the Honduran Rosewood. I can't help it, the rosewood just sounds better. Since this is supposed to be a straight up instrument, the ebony is the pick. Right now it is planed top an bottom fairly flat. I put tape on it to mark the long cuts. The small end is about 9mm thick and the wide end is about 13mm thick. This is because of the radius on the top. Do the trig, it doesn't hurt. At first glance fingerboards seem simple enough. That's what I thought. Then one day a few years ago someone wrote on maestronet what a complex engineering feat they were. What? It's just a board, angled on each side about 2 degrees, with a 42mm radius on the top, a 5.5mm flat along the edge, undercut underneath from almost where it cantilevers over the end of the neck, has a slight radius along the length on the top giving a .5 to 1mm relief about 2/3 of the way down, and a slight radius on the sides to keep the 5.5mm flat the same height in spite of the relief on the top. The strings can't buzz anywhere along the length when stopped by your finger, and at the same time the pressure should feel the same, from string to string and from top to bottom. Simple. The pressure part is what I'm just learning about. A straight board will not buzz, if the string height at the end of the board is not too low. Then why put the relief in? Feel. If you pull back on a long bow, you pull in the middle. If you pull an inch above the middle it will feel harder, even though the pressure on the string is the same. Move your hand even closer to the bow and the pressure seems to go up even more. The same goes for pushing the strings down on the fingerboard. In the middle of the length, an octave up, the sting will feel it's lightest. Up or down the fingerboard from there and the string feels tighter. You can make the fingerboard so the clearance at the end is less than normal and the undercutting is a little more than normal and the feel will be almost the same the entire length. Most fingerboards aren't done this way, I don't know why. May be tradition, may be projection, may be something I haven't thought of. Anyway, a fingerboard is more than it seems, but not a thing to worry about. But then again I don't worry about anything.

Sunday, February 13, 2011

F holes are cut


Well the f holes are in so it's time to finish tuning the belly up.They aren't finished, but in the tuning process they will be, along with the fluting.I found a really simple and effective way to cut the terminal holes. I chucked a brass rod in my lathe, turned it down to just under 10mm about 10mm back, drilled a 1/8 hole in it (same size I drilled as my pilot holes), then relieved the inside about 8mm deep forming a tube shape. A few slashes with a thin file and I had teeth on it. Using the 1/8 drill as a guide the tool worked great, cut even better than the other ones did.

I didn't have as much luck cutting the actual shape though. All the other violins I made out of Englemann spruce. This one is Adirondack spruce, or red spruce. They are both spruce but different animals. Red spruce is stiffer, cuts in long fibrous pieces, has much harder growth lines, and is just not as easy to cut. I usually take a couple of wedge shaped chunks out of the main length of the hole and it is through. Then I just took full depth cuts with the knife well inside the line until the hole was through the entire length. Then it's just a matter of opening the width up. I couldn't do it that way on the red spruce. I couldn't get my knives to poke through it at all! It took a while but I finally broke though, and in the process chipping out some parts on the inside. I'll have to glue them back in. Even cutting the sides to width, using a slicing or paring cut wan't as much fun. The blade was twisting and bending. The knife I was using is just a #11 X-acto knife. It just isn't stiff enough. I asked for suggestions on maestronet.com and Michael Darnton says he uses an 8mm laminated Japanese knife. Like E. F. Hutton, when Michael Darnton talks..... It will be ordered. I have some laminated Japanese gouges and chisels and they are really nice. I'll have to make a handle, but that should be fun. My wife says I can't just use anything the way it comes, so it's a good thing I have to do something to finish it.

Tuesday, February 8, 2011

Cutting the terminal holes


I started cutting the f holes today. The first step is drilling the terminal holes. If you've ever drill holes in wood you know what happens when you break through...you get some chip out. There is neat way around that, drill a smaller hole and enlarge it with a piloted cutter. You can buy a really nice set of these, in .5mm steps, for violin/viola or cello for $100 and change. Or if you're a machinist, have a mini lathe in the basement, and have some old indicator holder pieces you can make your own. Guess which way I did it. Mine probably don't work as well as the store bought, but the price was right. The way it works is this: You drill a hole in the center of where the terminal will be, the same size as the pilot shaft on the tool you made, or bought. Then you slip on (screw on in my case) the right size bit for the whole you're cutting. Slip the pilot into the hole you drilled and then start turning the bit into the wood. It should cut a perfectly round hole exactly the size it was made. Here's the part that makes it a great idea. Only cut the bigger hole half way through. The pull out the tool, slip the pilot in from the back side and continue drilling the big hole from the inside. When the two holes connect a plug will fall out and your hole is done. Continue on for the other three holes, being sure to use the right tip for the hole you are doing. It would be hard to hide a 8.7mm UPPER terminal hole! I have four sizes: 6.5mm, 6.7mm, 8.1mm and 8.75mm. Don't exactly remember what I made them for, but I'm guessing 2 were for the Ole Bull, and the other two were for whatever model I was working on when I came up with the idea of making the tool. The "Titan" model I'm going for has 6.8mm and 9.6mm, so I don't have the right combo. Maybe I'll scrounge around and see if I can find something to make a 9.6 out of. If I remember correctly, 8.75 was the diameter of the fittings I had, so it was the largest size I could make out of them. If you are making a Guadagnini model, with teardrop holes you can disregard this post. By the way I think the teardrop Guads are pretty cool looking.