I am going to try a new way of finishing up an instrument. I think it will be more like the original way they were made. I have the plates finished on the inside, and mostly finished on the outside, except for the edge work. I made maps of the thicknesses so I don't have to try to remember where some low spots are, and will glue them up, and tune them from the outside as a unit. Seems reasonable to me. We will see how it goes. This is what I have on a violin, and a viola that I'm trying this on. First the viola:
It is the model I drew up that is in between a Gagliano cello, and a Gagliano violin. It looks like a Grancino. As such, I gave it a thick center 7.5 mm, and the wood seems to like it. I wrote the free plate tap tones on the chart as well. I can keep the charts for my referance, and note areas where I took stock off after gluing up, and maybe the tap tones when glued up, and then after tuning. The belly has no bass bar yet. The archings are very low, 16.5-17 mm. Like a del Gesu viola.
The other is a del Gesu violin. The belly is very stiff, even at 63 grams and no bass bar. The back seems fairly stiff as well, and has a maximum thickness of 5.1, but I cn't get a real ring tone out of it. Maybe an Eb.
This one I didn't put the purfing in, or the undercut. Besides in the corners, there really isn't much of a recure in it. The edges are quite thin, and just a scant overhang, I'll do the purfling when it is assembled. It won't be exactly Cremonese; I won't nail the neck on first; but the procces should be close to what they did.
Today I cut two bass bars, trimmed them close to size, and glued the little guides for fitting them. Took about an hour. I found an easy way to rough the bottom out. Clamp a board on the belly so the bar will lay flat on it when in the right spot. Mark the bottom with a washer, and trim. Do it again and it makes a mark on the shallow del Gesu. Remove the board, and place it the other side, and mark it the same way. Trim both sides to the same distance from the line, and you are close enough to start chalk. The viola needed two roughings, and then both side. Really easy. I also found that the extra length of the bar was easily sawn into guides. Why didn't I think of that before.
Tomorrow I'll start fitting.
Follow along as I try to make a violin that will change me from a wannabe violin maker, making VSO's (violin shaped objects), to a real violin maker. Some of my methods are unorthodox, and I welcome all comments or questions.
Sunday, December 14, 2014
Thursday, November 27, 2014
Cello Plane
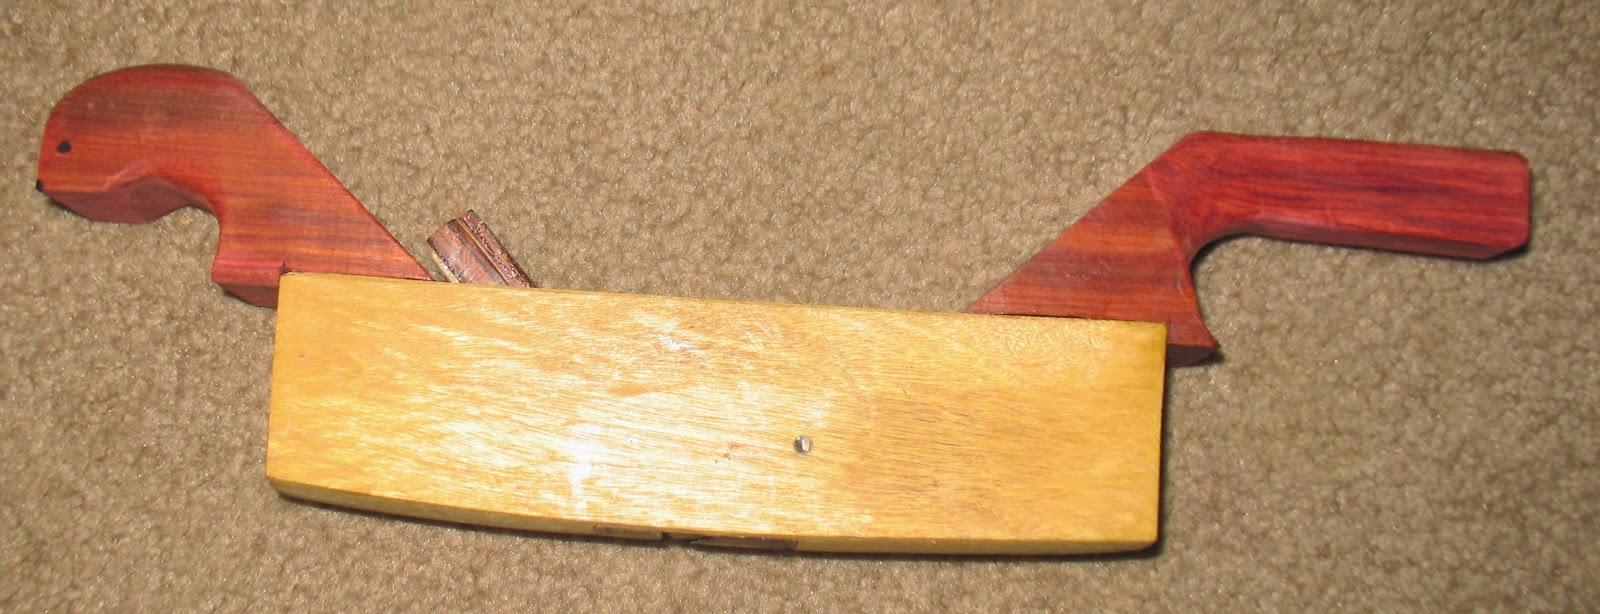
I've been working on a cello plane for over a week now. It is finaly done. I made it our of a chink of Yellowheart I had. Ijust cut a slot in it for the blade, and there is a wedge that closes the gap before the blade. I had to make two inserts for it; one before the blade, and the other at the blade tip, The Yellowheart is kind of splintery, and the edges there got nasty from going at it with chisels.
The blade is 7 mm thick A9 that is 60rc. It should hold up fairly well, and be solid enough. It is set at about 16 degrees or so, and the angle on the blade is about 33 degrees, so it is approximately a York pitch at 49 degrees.
It works good, but I only tried it on a chunk of maple, and didn't have the handles on it yet, so I don't know how it really feels. The handles should make it easier to use. The front handle looked like a weasel to me, so I added two eyes and a nose to make him Mr.Weasel. Here he is:
I hope there is enough room for chips.
I chose the arch this way to be slightly smaller that the smallest that I might find in the cross arch of a cello at the c bout.
The arch this way would fit in the shortest, deepest cello back.
There he is complete.
That part is out of the way.
The blade is 7 mm thick A9 that is 60rc. It should hold up fairly well, and be solid enough. It is set at about 16 degrees or so, and the angle on the blade is about 33 degrees, so it is approximately a York pitch at 49 degrees.
It works good, but I only tried it on a chunk of maple, and didn't have the handles on it yet, so I don't know how it really feels. The handles should make it easier to use. The front handle looked like a weasel to me, so I added two eyes and a nose to make him Mr.Weasel. Here he is:
I hope there is enough room for chips.
I chose the arch this way to be slightly smaller that the smallest that I might find in the cross arch of a cello at the c bout.
The arch this way would fit in the shortest, deepest cello back.
There he is complete.
That part is out of the way.
Tuesday, November 11, 2014
Blocks Almost Done
I have a revelation: cellos are bigger than violins and violas. That was pretty profound wasn't it? I have the blocks glued on, and mostly shaped. The c bouts are finished up, and I left the upper and lower parts of the corners a little thick at the point. That way when I trim the c bouts ribs, they will have some support behind them. That works better.
I used my gouges for the roughing. I need some longer ones. These are knuckle smashers. They cut good though. To smooth them up I used a rasp. It worked great on the MDF form, but they only cut this wood against the grain. With the grain it just skips across. My other file, an Iwasaki, works great either way. I have a flat one and a half round one. They are really nice tools. I need to buy another set that are longer, and are coarser, for this kind of work. They might even be useful for the cello scroll and neck. I finish them up with at round block with snadpaper wrapped around it.
I need to make a cello size rib iron. I like the looks of the one that Joe Swenson showed on maestronet. I have one that works with a heat gun too, but it is too small for a cello. I also need to make a couple of roughing planes up. I have the blades, now I need to cut some wood. The blades are A-9 (I think) and 60rc. Does anyone know anything about A-9 blades? I know that they are very easy to sharpen, but that's it.
I used my gouges for the roughing. I need some longer ones. These are knuckle smashers. They cut good though. To smooth them up I used a rasp. It worked great on the MDF form, but they only cut this wood against the grain. With the grain it just skips across. My other file, an Iwasaki, works great either way. I have a flat one and a half round one. They are really nice tools. I need to buy another set that are longer, and are coarser, for this kind of work. They might even be useful for the cello scroll and neck. I finish them up with at round block with snadpaper wrapped around it.
I need to make a cello size rib iron. I like the looks of the one that Joe Swenson showed on maestronet. I have one that works with a heat gun too, but it is too small for a cello. I also need to make a couple of roughing planes up. I have the blades, now I need to cut some wood. The blades are A-9 (I think) and 60rc. Does anyone know anything about A-9 blades? I know that they are very easy to sharpen, but that's it.
Sunday, November 2, 2014
Cello Mould Almost Done
I've been working every Saturday, and it doesn't seem like it will end any time soon. I have my mould almost done. It is all sawn out. The coping saw actually worked really well. I'll have to see what kind of blade it is. It came with 4, that may last a long time, but it really cuts fast. I filed them down a little bigger than the line, and now I'm blending them in with the top and bottom patterns clamped in place. I used a really coarse rasp, and it worked like a charm on this composite stuff. I have this side done, and need to flip it over to do the other.
You can really see the taper on the ends. The length magnified the most. The three layers will help get the ribs bent in the right place. I don't want it looking all bent out of shape. One thing I noticed is that the Gaglianos are always pretty symmetrical.
I used a mask when cutting and filing this stuff; it makes a lot of dust. Then it is made with who knows what kind of glue; so it is best to err on safty. The top one by twos were planed down so the top pattern is on an angle that will taper the ribs 6-7 mm. This way I can have the ribs overhang the top and bottom by the same amount, and it will be easy to set up the blocks, and mark out the rib heights when they are glued on, so they don't get planed down too far. The block will glue directly on the one by twos, and will be on a taper too. That should not be too hard if I but the mould on blocks, and make up a marker to mark a cutting line.
I never thought about how big the blocks will be. I will scrounge around and see what I can find. The corners will be easy enough. The end blocks are a different story. What kind of wood do you guys like? I used poplar, not yellow poplar that is harder, and greener; but Populus that is light and kind of fuzzy. It files really nicely, but I don't have a file that long! I used spruce, but can't say that was anything special, just kind of a pain. I used some stuff that was all different colors, and had an interlocked grain for endblocks, but that was too small, and it is gone. Would just a 12 X chunk of quarter sawn willow be the best option? Problem is trying to find something that is quarterwawn.
You can really see the taper on the ends. The length magnified the most. The three layers will help get the ribs bent in the right place. I don't want it looking all bent out of shape. One thing I noticed is that the Gaglianos are always pretty symmetrical.
I used a mask when cutting and filing this stuff; it makes a lot of dust. Then it is made with who knows what kind of glue; so it is best to err on safty. The top one by twos were planed down so the top pattern is on an angle that will taper the ribs 6-7 mm. This way I can have the ribs overhang the top and bottom by the same amount, and it will be easy to set up the blocks, and mark out the rib heights when they are glued on, so they don't get planed down too far. The block will glue directly on the one by twos, and will be on a taper too. That should not be too hard if I but the mould on blocks, and make up a marker to mark a cutting line.
I never thought about how big the blocks will be. I will scrounge around and see what I can find. The corners will be easy enough. The end blocks are a different story. What kind of wood do you guys like? I used poplar, not yellow poplar that is harder, and greener; but Populus that is light and kind of fuzzy. It files really nicely, but I don't have a file that long! I used spruce, but can't say that was anything special, just kind of a pain. I used some stuff that was all different colors, and had an interlocked grain for endblocks, but that was too small, and it is gone. Would just a 12 X chunk of quarter sawn willow be the best option? Problem is trying to find something that is quarterwawn.
Wednesday, October 29, 2014
Needed a Bigger Coping Saw
I started to build my cello mould. I like to spell it with a 'u' because to me mold is what grows on something that is damp and rotting. I will have a center pattern that will be glued together as one piece, and a top and bottom pattern that will be pinned and screwed to it with one by twos. The one by twos will also serve as a gluing surface for the blocks. Each layer is a different size and I will file it all on an angle when I get it assembled. The blocks will also be angled, so setting them up will be more work, but it shouldn't be that hard.
I took my drawing up to Staples, and had them make a copy of the top half at 200%, 201%, 202%, 203%, and 204%. Then they did the same for the bottom half. It is much cheaper to copy them out as 12" X 18" halves and then tape them together, than to copy them out as 24" X 36". The patterns are just halves, so I glue the copy right on the board with spray adhesive. I cut my top and bottom patterns out of 1/4" hardboard, and smoothed them out.
I thought that I could only get on side of the pattern on each length of shelving. The shelving is about 11.5" wide, and by putting one half on one side, and the other flipped on the other side, the tops conveniently sit in the c bout area of the other. I can save 3 full boards. That could be another cello mould. So I drilled my locating holes that will go through the mould and line up the patterns for marking out the corners on the blocks, and I located the holes using a flashlight to line them up with the copy, and then marked them out.
Then I realized it. I don't have a saw that can cut it out!
My coping saw is only 4," and it has a broken tang, so it is hard to change blades. So I picked one up at the hardware store. It seemed all right. It had a nice thick handle on it, but when you use it you have to constantly watch that the tang where the handle is stays put. It doesn't want to. I have a really nice deep throat fret saw, but the blade can't turn, so it won't work. The only option I've seen is one made by Knew Concepts. It is a pricy option. An 8" fretsaw that will only rotate 45 degrees each way for $103, or a coping saw that looks like about 6" for $149. I'll live with what I have.
I still have the top and bottom to cut out. I also need to pick up some screws, and 1/2" and 1/4" dowels. I always think that I have screws in one of the two boxes of drawers hanging on the wall. They have a lot of screws, bolts, nuts, washers, and other things; but never what I want.
This is it so far.
I took my drawing up to Staples, and had them make a copy of the top half at 200%, 201%, 202%, 203%, and 204%. Then they did the same for the bottom half. It is much cheaper to copy them out as 12" X 18" halves and then tape them together, than to copy them out as 24" X 36". The patterns are just halves, so I glue the copy right on the board with spray adhesive. I cut my top and bottom patterns out of 1/4" hardboard, and smoothed them out.
I thought that I could only get on side of the pattern on each length of shelving. The shelving is about 11.5" wide, and by putting one half on one side, and the other flipped on the other side, the tops conveniently sit in the c bout area of the other. I can save 3 full boards. That could be another cello mould. So I drilled my locating holes that will go through the mould and line up the patterns for marking out the corners on the blocks, and I located the holes using a flashlight to line them up with the copy, and then marked them out.
Then I realized it. I don't have a saw that can cut it out!
My coping saw is only 4," and it has a broken tang, so it is hard to change blades. So I picked one up at the hardware store. It seemed all right. It had a nice thick handle on it, but when you use it you have to constantly watch that the tang where the handle is stays put. It doesn't want to. I have a really nice deep throat fret saw, but the blade can't turn, so it won't work. The only option I've seen is one made by Knew Concepts. It is a pricy option. An 8" fretsaw that will only rotate 45 degrees each way for $103, or a coping saw that looks like about 6" for $149. I'll live with what I have.
I still have the top and bottom to cut out. I also need to pick up some screws, and 1/2" and 1/4" dowels. I always think that I have screws in one of the two boxes of drawers hanging on the wall. They have a lot of screws, bolts, nuts, washers, and other things; but never what I want.
This is it so far.
Wednesday, October 22, 2014
A Cello from Start to Finish
I have some projects going on. The Gagliano viola, and the Plowden, need to be finished up. But my big project will be the Gagliano cello. I don't have the Allesandro Gagliano poster. I'm using the Nicollo Gagliano from 1774 that was featured in the 2008 Christophe Landon calendar that came in The Strad. It also has a cool Gagliano violin on the same page. That's what got me hooked on Gagliano.
It is a quite narrow, shorter cello, that looks narrower than the nice one on the Norway site, I forget what that one is. I like the shape of the narrow one better. I bought some shelving for 49 cents each at Menards to make up a mold.
Here is my drawing. It is 732 long, and the waist is 222. I may make the top 2% bigger ala Guadagnini. Any help or suggestions?
It is a quite narrow, shorter cello, that looks narrower than the nice one on the Norway site, I forget what that one is. I like the shape of the narrow one better. I bought some shelving for 49 cents each at Menards to make up a mold.
Here is my drawing. It is 732 long, and the waist is 222. I may make the top 2% bigger ala Guadagnini. Any help or suggestions?
Tuesday, October 14, 2014
Gagliano
I'm working on a Plowden del Gesu. It is the first violin with a low arch that I've tried. It's coming along good. I am also fixing up the purfling on the Gagliano viola I drew up. I really like the shape of it. I like the shape of the Gagliano cello and violin too. I've been working on Guadagnini viola, and the purfling is way off from even around the top of the back. I have no idea how that happened. I found out that the slab back should have been set up heart side up. That just seems weird to me, but I've read it from several sources lately.
Besides that: I just don't like the big chunky look of the beast. It is close to being hideous.
So I was trying to make up a viola shape that was a mix of the older, slimmer Guadagnini violins and cellos, and morph them into a viola, like I did the Gagliano. It just wasn't working. I had a dream that night of throwing all the papers in the trash. So that's what I did. I'm going to stick with what I like and make a family of instruments that I drew up from the photos of the Gagliano cello and violin. They only showed the backs so I used photos of other Gaglianos to get the f holes designed.
The shape of the violin is very much like the early Guadagnini violins. The holes aren't cool oval ones, but then the corners don't poke out like sore thumbs either. Even the arching seems to have the fullness of the Guadagnini. He made high arched, and low arched violins, so there is room to play around. The viola has a 19 mm or so arch. I picked that because it looks like a Grancino viola of about the same size (420 mm), so it isn't unduly high.
I thought of getting the poster for the Gaglino violin, and cello. The cello is by Allisandro? and not Nicolo. Did they work in the same style? Maybe I can just come up with my own. Right now I'm happy with the outlines, and can get back to work. I will redraw the cello, the wone I have is a little messy, and have it blown up double size to make a pattern. Then I can make a mold and start on a cello too.
Besides that: I just don't like the big chunky look of the beast. It is close to being hideous.
So I was trying to make up a viola shape that was a mix of the older, slimmer Guadagnini violins and cellos, and morph them into a viola, like I did the Gagliano. It just wasn't working. I had a dream that night of throwing all the papers in the trash. So that's what I did. I'm going to stick with what I like and make a family of instruments that I drew up from the photos of the Gagliano cello and violin. They only showed the backs so I used photos of other Gaglianos to get the f holes designed.
The shape of the violin is very much like the early Guadagnini violins. The holes aren't cool oval ones, but then the corners don't poke out like sore thumbs either. Even the arching seems to have the fullness of the Guadagnini. He made high arched, and low arched violins, so there is room to play around. The viola has a 19 mm or so arch. I picked that because it looks like a Grancino viola of about the same size (420 mm), so it isn't unduly high.
I thought of getting the poster for the Gaglino violin, and cello. The cello is by Allisandro? and not Nicolo. Did they work in the same style? Maybe I can just come up with my own. Right now I'm happy with the outlines, and can get back to work. I will redraw the cello, the wone I have is a little messy, and have it blown up double size to make a pattern. Then I can make a mold and start on a cello too.
Subscribe to:
Posts (Atom)